Connecting Your Data
Connecting to Amazon S3
Privacy Dynamics can connect to your data lake hosted in Amazon S3. This guide helps you authenticate and authorize Privacy Dynamics to access your data in S3.
Requirements
To complete this guide, you will need the following:
- An S3 bucket.
- An IAM user with Administrator privileges to create users (and optionally policies).
- A Privacy Dynamics account.
Instructions
Before you can connect to S3 in Privacy Dynamics, you will want to create a new IAM User and, optionally, IAM Policies for Privacy Dynamics to use.
Configure IAM
Tip
The fastest way to get started is to assign a new IAM user the permissive AmazonS3FullAccess policy. If that is not appropriate for your security posture, see below for a setup with more restrictive policies.
- Log into your AWS Console using a user with the Administrator policy (or, at a minimum, a user that can add users and attach policies).
- Visit the IAM Users page and click Add Users.

- Provide a User name (we like
svc_pvcybut this can be anything) and check the box for Access key - Programmatic access, then click Next.
- Select "Attach existing policies directly" and then type "S3" into the filter box before selecting the
AmazonS3FullAccesspolicy. Click Next. Note: This policy allows the user to list, read from, and write to all folders in all buckets on the account! For a more restrictive policy, see below.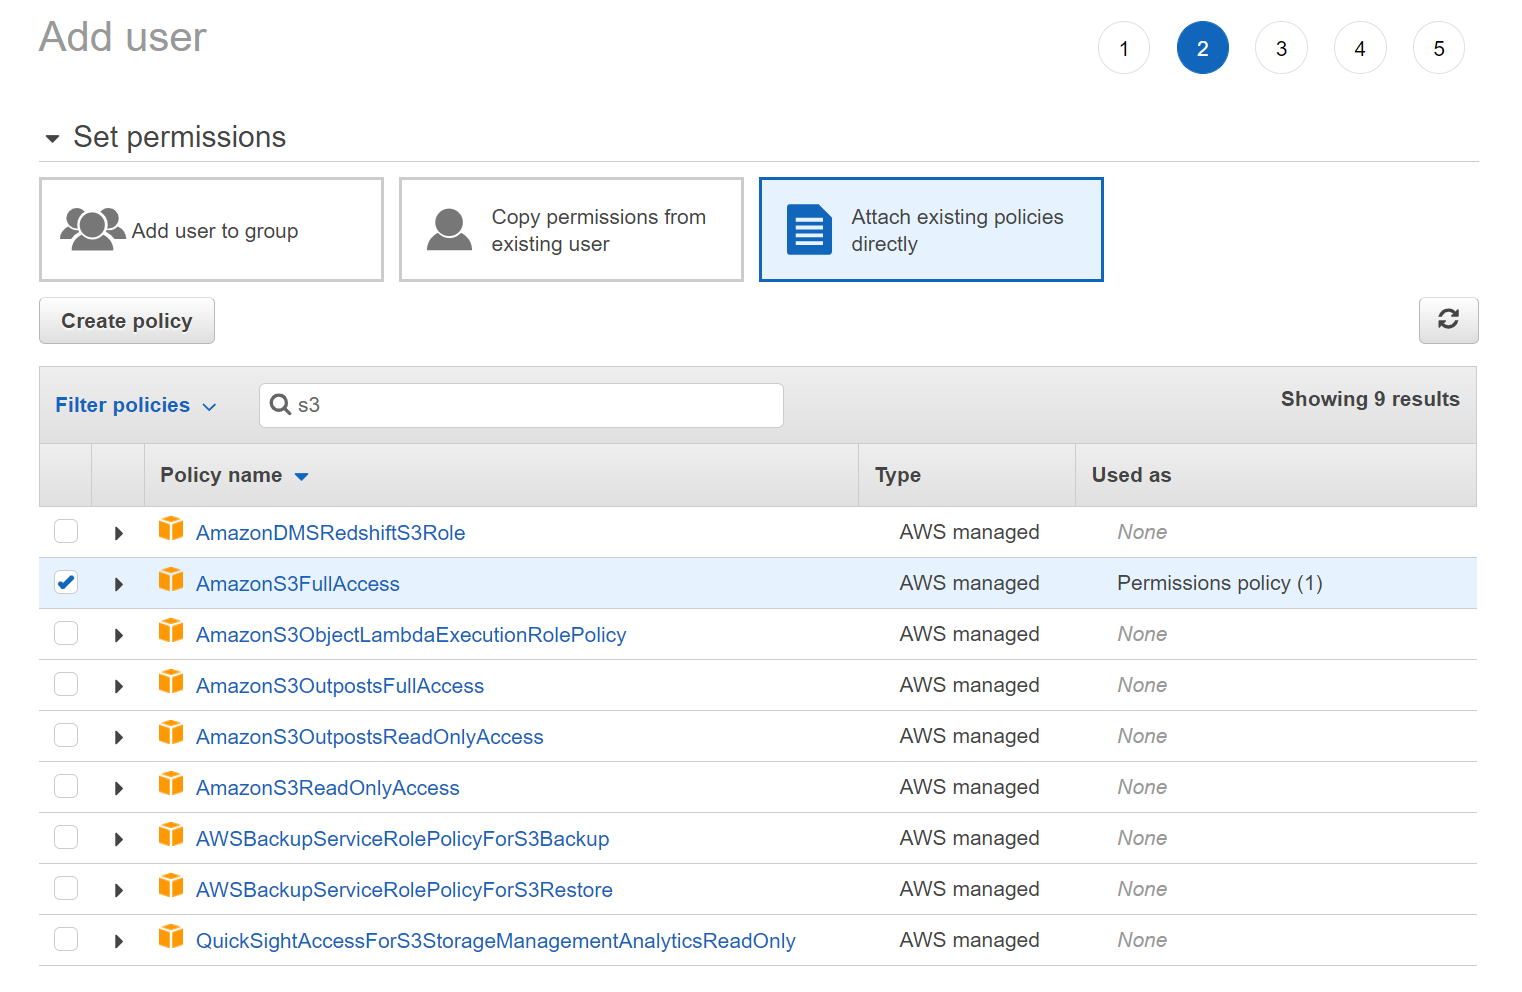
- Add any desired tags for this user, then click Next.
- The user has now been created. Leave this window open or copy the Access Key ID and Secret access key, since you will need those in the next step.

Tip
If your bucket is encrypted with a KMS-managed key, you will need to add a policy to the KMS key that grants this user access to that key. See the AWS Documentation for more details.
Add the S3 Connection in Privacy Dynamics
Note that a connection must be created for each IAM User that Privacy Dynamics will use to authenticate with your AWS Account. A single Connection can have many buckets.
Sign in to your Privacy Dynamics account.
Go to the Connections page.
Select Add Connection.
Choose S3 and select Next.
Enter the connection details:
- Name - a name for you to identify the connection.
- AWS Key ID - The Access Key associated with the IAM user you created above.
- AWS Secret Access Key - The Secret Access Key for your IAM user.
- Region Name - The name of the AWS region where your bucket is located (e.g.,
us-east-1).

Tip
If visible, do not select the checkbox labeled "Is S3 Compatible?"
- Select TEST CONNECTION to verify the credentials.
- Select ADD CONNECTION and your connection saves if there are no errors.
Create a Project Using S3
- Select the Anonymize button on the top nav bar.
- On the "Choose Data" screen, select the new S3 connection as the Origin Connection.
- Optionally, enter a Bucket Prefix to filter the list of objects below. If the prefix is a folder, enter the trailing slash.
- To use the same IAM User to write the treated data to S3, select Destination Connection: Same as Origin. Select the bucket and optionally a prefix (or folder, with a trailing slash) to prepend to the object name.

- Select the files from the list of datasets, and then click Next to configure your dataset.
Advanced Configuration: Creating a Minimal IAM Policy
To anonymize your data, the Privacy Dynamics User must be able to:
- Read from a bucket or folder containing raw data.
- Write to a bucket or folder containing anonymized data.
- (Optional) List buckets for the Privacy Dynamics user to select during Project configuration. Note: Without the ListAllMyBuckets privilege, you must type the name of the bucket into the UI, instead of selecting from a list.
To that end, we recommend creating two new IAM Policies:
S3ReadRawSensitiveBucket: A policy to allow us to list and read from the bucket containing raw data.S3WritePrivacySafeBucket: A policy to allow us to write to the anonymized bucket.
You can then attach both policies to the svc_pvcy IAM user, or, if you prefer, you can create two IAM Users with one policy each, and then set up two connections in Privacy Dynamics, one for each IAM User.
Creating the List and Read Policy
- Visit the IAM Policies Page and click Create Policy

- Using the Visual Editor, select S3 as the service. Under Actions, select List > ListAllMyBuckets, List > ListBucket, and Read > GetObject. Under Resources, select Specific and then define the specific bucket(s) and folder(s) that you would like to grant List and Read access to (note that ListAllMyBuckets will not be affected by the Resource restrictions). Then select Review Policy to continue.

Tip
If your bucket uses ACL, you may need to add the "Permissions > GetObjectAcl" permission to this policy.
- Alternatively, select the JSON tab and enter the following document, substituting the ARN of your resources:
{ "Version": "2012-10-17", "Statement": [ { "Sid": "Allow Reading from Raw Bucket", "Effect": "Allow", "Action": [ "s3:GetObject", "s3:ListBucket" ], "Resource": [ "arn:aws:s3:::<YOUR-BUCKET>", "arn:aws:s3:::<YOUR-BUCKET>/<YOUR-FOLDER>/*" ] }, { "Sid": "Allow Listing All Buckets", "Effect": "Allow", "Action": "s3:ListAllMyBuckets", "Resource": "*" } ] } - Give the policy a good name and description. Ensure there are no warnings about ineffective policies, and then select Create Policy.

Creating the Write Policy
- Visit the IAM Policies Page and click Create Policy.
- Using the Visual Editor, select S3 as the service. Under Actions, select Write > PutObject. Under Resources, select Specific and then define the specific bucket(s) and folder(s) that you would like to grant Write access to. Then select Review Policy to continue.

Tip
If your bucket uses ACL, you will need to add the "Permissions > PutObjectAcl" permission to this policy.
- Alternatively, select the JSON tab and enter the following document, substituting the ARN of your resources:
{ "Version": "2012-10-17", "Statement": [ { "Sid": "VisualEditor0", "Effect": "Allow", "Action": "s3:PutObject", "Resource": "arn:aws:s3:::<YOUR-BUCKET>/<YOUR-FOLDER>/*" } ] } - Give the policy a good name and description. Ensure there are no warnings about ineffective policies, and then select Create Policy.

Attaching the Policies to the User
- Visit the IAM Users page, and either select Create User (follow instructions above) or select the
svc_pvcyuser from the list. - Select Add Permissions.
- Select Attach Existing Policies Directly and then select the policies created in the last step before selecting Next: Review.

- Select Add permissions.
Other Configuration
If you have network access controls in place that limit connections to S3, you will need to add Privacy Dynamics' IP addresses to your Allowlist. You can find those IP addresses in this public JSON file.