
Ted Conbeer
· 7 min read
Publishing De-Identified Data with Quilt
Quilt is a lightweight data catalog that improves data governance and reproducibility in data lakes. In this post, we use Quilt to publish a Package of de-identified data with a few lines of Python.
Data lakes make it easy for teams to work with, and share access to, large amounts of structured and unstructed data. While hosting a lake on a shared filesystem or object store, most commonly Amazon's S3, is simple, governing and versioning it is not.
Quilt is a Python package and CLI that makes it simple to create and maintain a "self-organizing data catalog". At the heart of Quilt is a data Package, which contains data and metadata, and (like a software package) can have many immutable revisions to assist with reproducibility, which is critical in many machine learning workflows. Quilt stores Package data and metadata in an S3 bucket called a Registry. Quilt also provides a webserver that can run locally or on a server to provide a nice UI for listing and browsing any Packages in the Registry.
We learned about Quilt after discussing our product with one of Quilt's customers, who immediately saw the benefit of deploying both tools together. Privacy Dynamics can create a de-identified replica of the data in a data lake, with no PII and minimal distortion. That de-identified data is useful for development and test environments, as well as analytical use cases, like training machine learning models on sensitive data using shared compute resources.
Since we replicate data, it can make it difficult to maintain the lineage of a de-identified dataset, and to share documentation for how the data was treated. Fortunately, Quilt makes it easy to publish and share Packages for the raw and treated data, including documentation.
How to use Quilt with Privacy Dynamics
In this walkthrough, we'll publish two Quilt Packages, one each for the raw (sensitive) and de-identified (or treated) data.
To follow along, you'll need access to an empty S3 bucket. We created a new bucket for
this demo at s3://quilt-pvcy-demo. Quilt recommends you enable S3's Bucket Versioning.
In this example, we're going to use the same S3
bucket to host the files and the Registry, but Quilt supports separate buckets, also.
You'll want to replace that URI with your own bucket in any code snippets.
Step 0: Install Quilt
Assuming you have Python installed, getting started with Quilt is easy.
For this tutorial, you'll want the Catalog extra. After activating a virtual environment:
$ pip install quilt3[catalog]You will also need to install and configure the AWS CLI, which Quilt uses to authenticate and interact with your S3 bucket.
Step 1: Create the Raw Package from Local Files
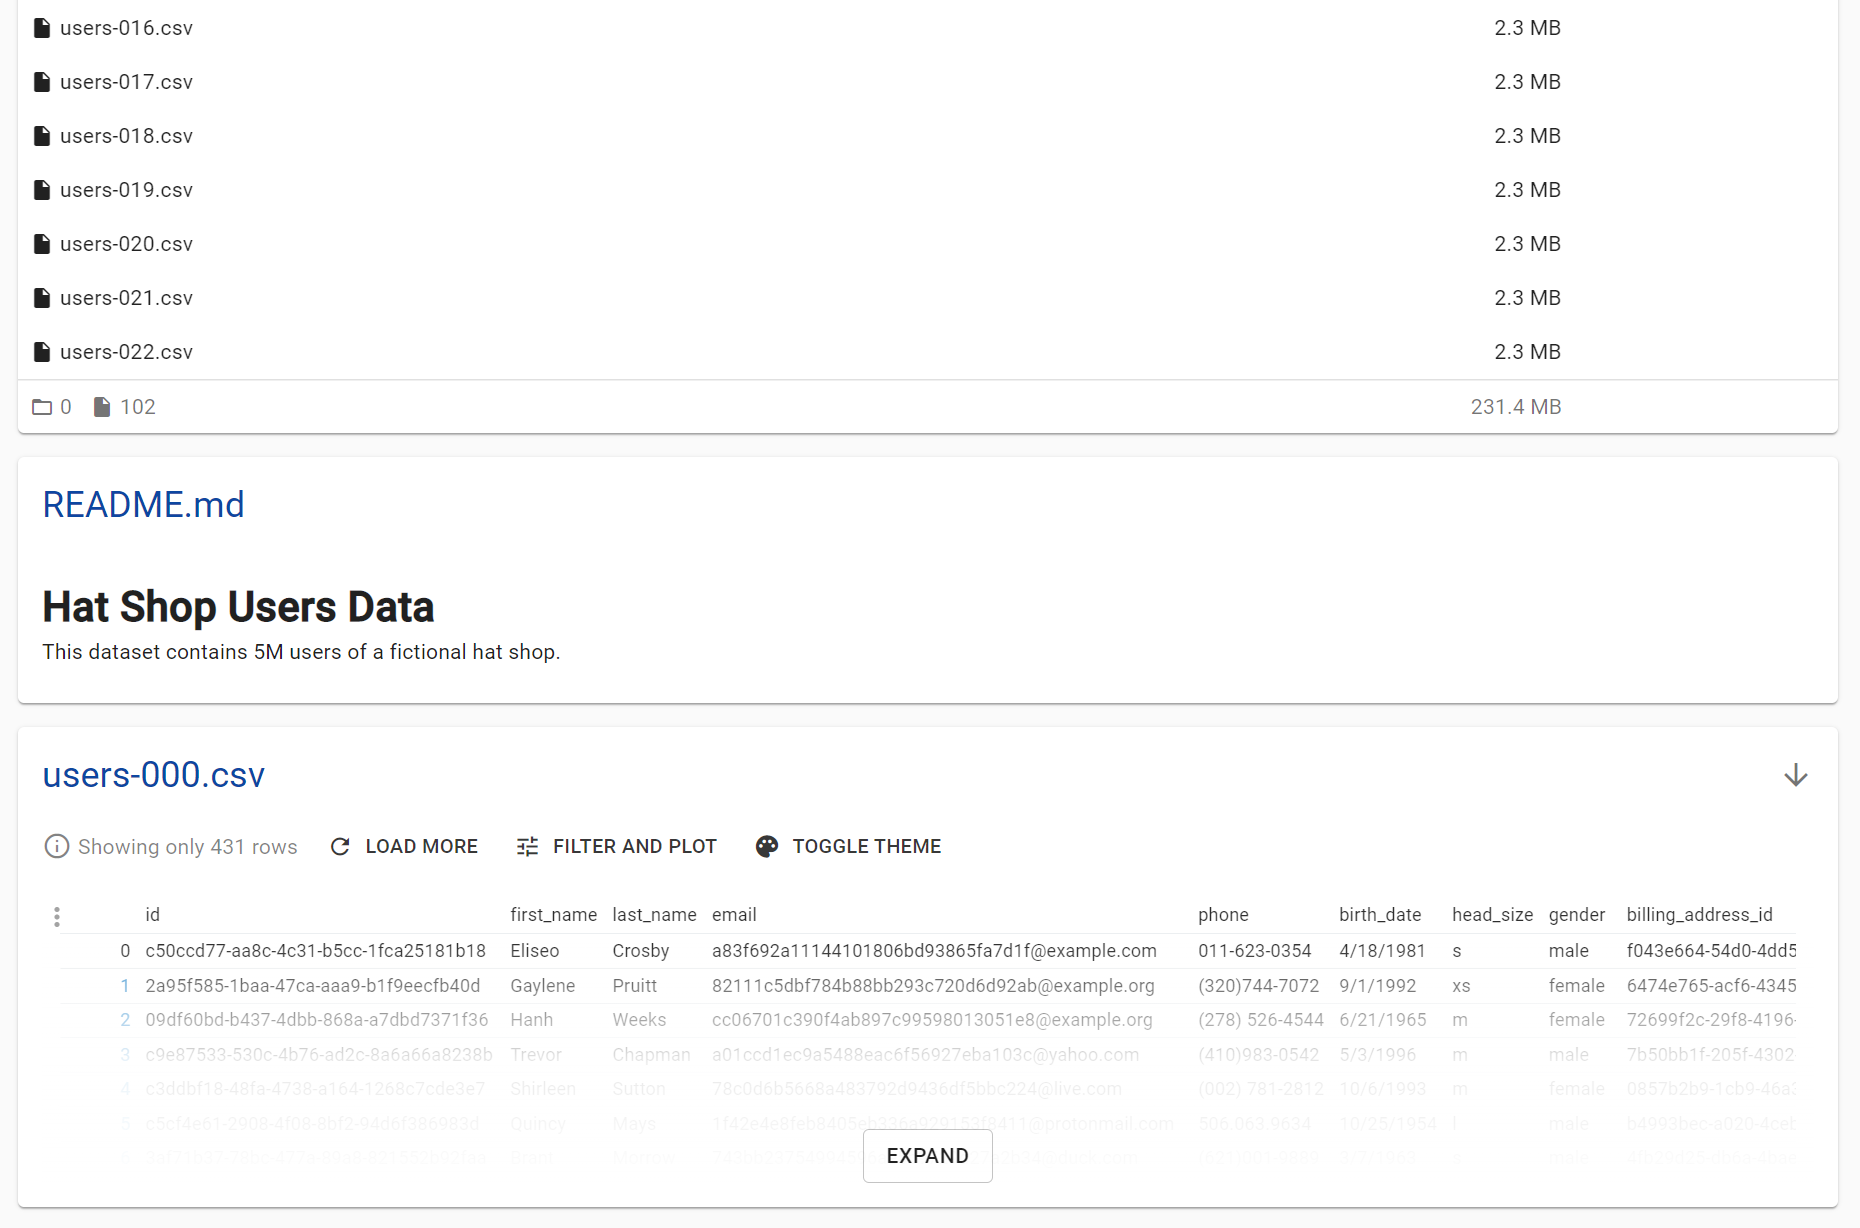
On our laptop, we have a directory called csv_data that contains 100 CSV files, each with
10k rows of (fake) customer data from our (fake) Hat Shop. That directory also includes
a README.md with some documentation, and a quilt_summarize.json, which defines some
config for how Quilt should display our Package in its catalog.
project_root
    └─csv_data
        └─quilt_summarize.json
        └─README.md
        └─users-000.csv
        └─users-001.csv
        └─users-002.csv
        └─users-003.csv
        ...
We can use Quilt to do 3 things at once:
- Create a Quilt Package from the files
- Upload the files to S3
- Create and upload Package metadata to the Registry
# push_raw.py
import quilt3
BUCKET = "s3://quilt-pvcy-demo"
def push_raw(message: str) -> None:
    pkg = quilt3.Package()
    pkg.set_dir(lkey="/", path="csv_data")
    pkg.push(
        name="quilt_pvcy_demo/raw",
        dest=f"{BUCKET}/raw",
        registry=BUCKET,
        message=message,
    )
push_raw("Initial commit")
Above, after initializing a Package object, we use set_dir
to add the contents of the csv_data directory to the package,
under the logical key / (i.e., the root of the package). We
then use pkg.push to push this local (in-memory) Package to
our Registry, give it a name (quilt_pvcy_demo/raw), and
define where we want the files to be stored, which is
under the raw key in our bucket (with dest=f"{BUCKET}/raw").
A Quilt push is analagous to git: Quilt will hash all of
the files and create a revision that can be accessed from the
hash of the contents. We also include a message to
accompany the revision.
Executing the code above produces this output from Quilt:
$ python push_raw.py
Hashing: 100%|███████████████████████████████████████████████████████████████████████| 231M/231M [00:00<00:00, 1.05GB/s]
Copying objects: 100%|████████████████████████████████████████████████████████████████| 231M/231M [00:01<00:00, 125MB/s]
Package quilt_pvcy_demo/raw@1cf94d9 pushed to s3://quilt-pvcy-demo
Run `quilt3 catalog s3://quilt-pvcy-demo/` to browse.
Successfully pushed the new package
Running the suggested command opens a new tab in our browser, which shows our Package in the catalog.

Clicking into the catalog, we can see our README file, as well as a preview of the data, which contains some PII!
Step 2: Create a De-Identified Dataset
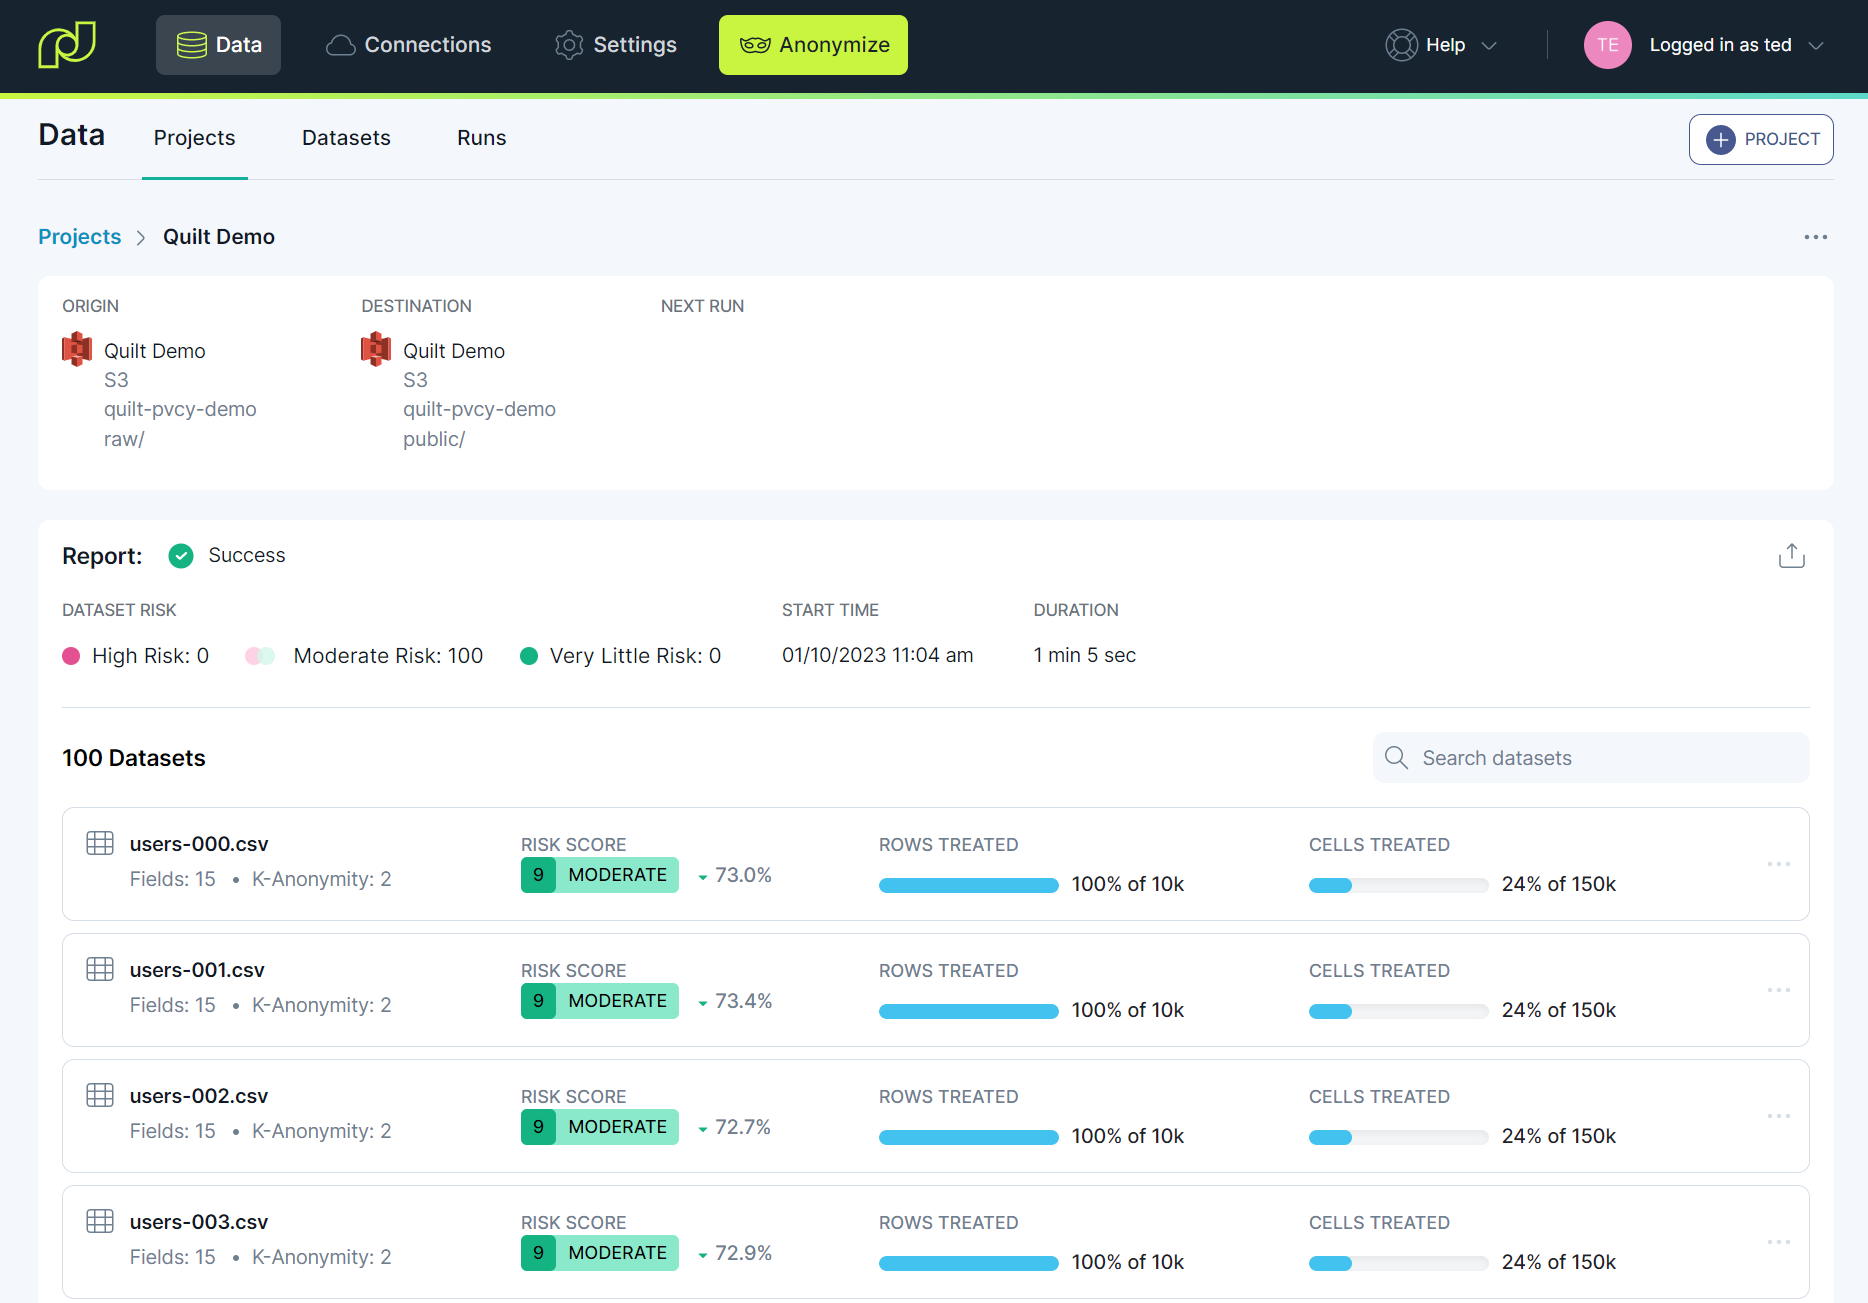
Now that our files are in S3, we can connect to them using Privacy Dynamics. After creating a connection with our S3 credentials, we create a new Project in Privacy Dynamics.
The first step of creating a Project is to Choose the data we'd like to
treat (/raw) and the destination for the treated data (/public).
We select all files in the directory in this example, but you can also choose to
ignore files or replicate them without treatment.

Next we choose how to treat the data. For this example, we'll stick with the default options, which redacts direct identifiers (e.g., name and email) by dropping the columns, and treats indirect identifiers through our micro-aggregation process.

Finally, we give the Project a name and (optionally) a schedule. That's it! We can now run the Project to treat our data.

After the project finishes running (in just over a minute), we can view the Project card, with summary treatment information about each file.
For more detail, we can click into any Dataset cards to see more information on the
treatment, including the semantic classification for each field, and the amount
of distortion introduced into the quasi-identifiers (in this case, the head_size field).

Step 3: Create a Package for the De-Identified Data
Back on our laptop, we run a few more lines of Python. This code is very similar to Step 1, but we're adding a mix of files that are already on S3 (our data) with some new files that are local (our documentation and config).
# push_treated.py
import quilt3
BUCKET = "s3://quilt-pvcy-demo"
def push_treated(message: str) -> None:
    pkg = quilt3.Package()
    pkg.set_dir(lkey="/", path=f"{BUCKET}/public")
    pkg.set(logical_key="quilt_summarize.json", entry="csv_data/quilt_summarize.json")
    pkg.set(logical_key="README.md", entry="csv_data/README.md")
    pkg.push(
        name="quilt_pvcy_demo/public",
        dest=f"{BUCKET}/public",
        registry=BUCKET,
        message=message,
    )
push_treated("Initial commit")
Executing the script gives us similar output to before:
$ python push_treated.py
Hashing: 100%|█████████████████████████████████████████████████████████████████████████| 100/100 [00:00<00:00, 32.2kB/s]
Copying objects: 100%|███████████████████████████████████████████████████████████████████| 100/100 [00:00<00:00, 289B/s]
Package quilt_pvcy_demo/public@083dadf pushed to s3://quilt-pvcy-demo
Run `quilt3 catalog s3://quilt-pvcy-demo/` to browse.
Successfully pushed the new package
While the output looks similar, the Hashing step took longer, since the files were remote. However, the Copying step was instantaneous, since Quilt is smart enough to know that the files are already where we want them.
We can once again view our Package Registry, and we see there is now a "public" Package containing the de-identified data.

Clicking into the quilt_pvcy_demo/public Package, we can see that the fields
containing direct ID's in the raw dataset have been dropped.

Step 4: Revising our De-identified Package
We treated our raw data with Privacy Dynamics' default settings, which dropped all of the direct identifiers. Alternatively, we can configure Privacy Dynamics to mask, hash, or fake values instead of dropping them.
In Privacy Dynamics, from the Project page, we select Edit Treatment Settings. We make three changes:
- We change the K-Anonymity value from 2 to 5 to provide more quasi-identifier protection.
- We lock the
idandbilling_address_idcolumns to keep those as-is in the treated dataset. - We choose Realistic for the
emailandphonecolumns to replace the real values with format-preserving, fake (randomly generated) values.

After clicking Save & Run, Privacy Dynamics re-processes our raw data with the new treatment configuration. Once the run is complete, we can push the updated data to Quilt.
# push_treated.py
import quilt3
BUCKET = "s3://quilt-pvcy-demo"
def push_treated(message: str) -> None:
    pkg = quilt3.Package()
    pkg.set_dir(lkey="/", path=f"{BUCKET}/public")
    pkg.set(logical_key="quilt_summarize.json", entry="csv_data/quilt_summarize.json")
    pkg.set(logical_key="README.md", entry="csv_data/README.md")
    pkg.push(
        name="quilt_pvcy_demo/public",
        dest=f"{BUCKET}/public",
        registry=BUCKET,
        message=message,
        force=True,
    )
push_treated("Revised treatment configuration: lock IDs, fake email and phone, k=5.")
This code is the same as before, but we have added a force=True argument to our
call to push, which is required when pushing a new revision of an existing
Package. We have also updated the commit message to explain the changes.
Now viewing the Package detail page, we see our updated commit message, and in
the data preview, we see the id, email, phone, and billing_address_id
fields have been added to the treated data. (Note: I've added a filter
to the files list for the purposes of this screenshot, but the new package
still contains all 100 files).

Finally, using the drop-down next to the Package name, anyone can select an
earlier revision of the Package (instead of latest) to browse the
contents from that revision.
Wrapping up
In this tutorial, we've used the Privacy Dynamics UI to configure and trigger the treatment of the raw dataset, but you can easily use our API to set up an automation to push packages to Quilt and include risk or treatment metadata in your Package's documentation or metadata. If you'd like to learn more, please reach out and we can help you get started.
We hope you can see how useful Quilt and Privacy Dynamics are together, and how powerful a workflow around de-identified data can be. If you are interested in a free trial of Privacy Dynamics, you can sign up, reach out for more information, or book a demo.